Whiten Teeth in Photoshop Tutorial
 Interested in knowing how to Whiten Teeth in Photoshop? Adobe Photoshop is a powerful tool and many times there are multiple ways to approach and accomplish the same effect. In this tutorial, I'm going to show you how to enhance teeth as we whiten and brighten them using a method that I believe offers the most flexibility-- using adjustment layers and masks. When you're done with this tutorial, the person in your photo will have 30% whiter teeth in just 3 minutes!
Step 1 - Create a Mask
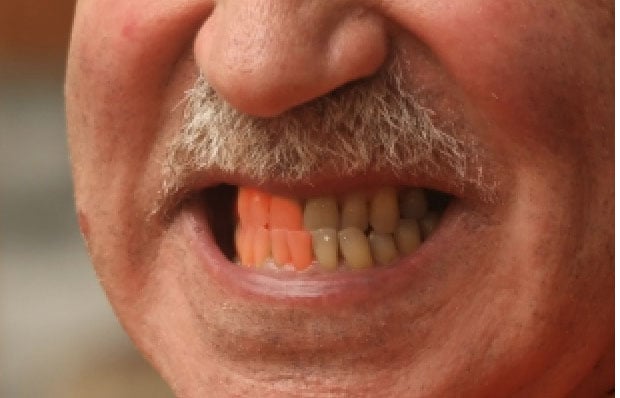
The first step is creating a mask. A mask allows Photoshop to only apply certain effects and adjustments within a particular area. We're going to create a simple mask for the teeth. 1. Select the the brush tool and a brush size between 10-20 pixels. 2. Click the "Quick Mask Mode" icon at the bottom of the toolbar. 3. With the "Quick Mask" enabled, carefully draw around and inside the teeth. If you mess-up, switch to the eraser tool.
Step 2 - Create an Adjustment Layer
We want our adjustments to only take place inside the mask we created. To do this, we'll create an adjustment layer tied to the mask we just created. 1. When you're done painting the mask, click the "Quick Mask Mode" icon at the bottom of the toolbar to turn it off. 2. You'll notice that the mask is now selected. However, the selection is for everything outside of the painting (i.e. pink colored) area. We did this to save time, instead of painting everything but the teeth. To invert the selection, type "cmd+shift+i" (Mac) or "ctrl+shift+i" (Windows). Now the teeth are selected. 3. At the bottom of the layers palette, click the "create new adjustment layer" drop-down icon and choose "Hue and Saturation." You'll notice that our adjustment layer has our mask attached to it, only affecting the areas inside the mask.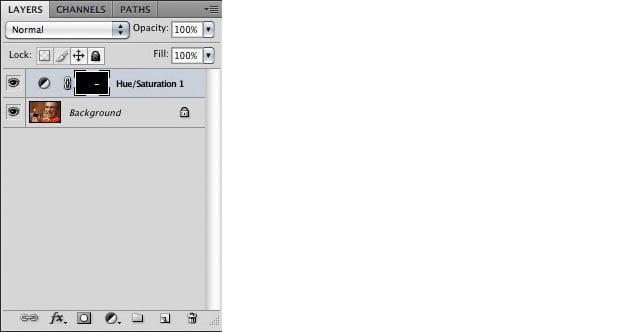
Step 3 - Adjust the Hue and Saturation
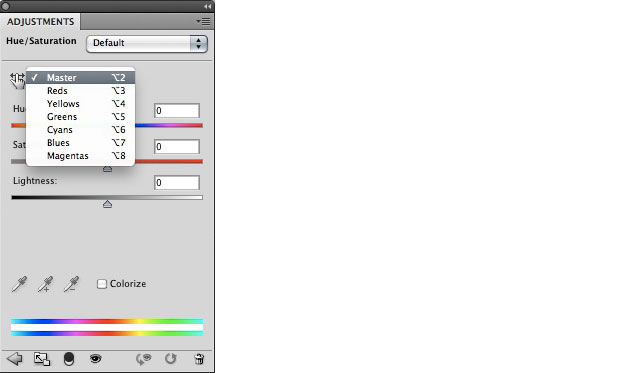
You've often heard of "yellow teeth" because many times people's teeth have a…well…yellow color to them! What we're going to do is take out that color and adjust the "whiteness" making the teeth shine. 1. In the Hue and Saturation adjustments, we're going to turn the saturation down, removing the color. If you want to concentrate on just the yellow or any other color that might be stained on the teeth, you can click the "master" drop-down, select a color range and then turn the saturation down.Note: turning the saturation down all the way makes the image black and white-- which will look fake. Be sure to choose an amount that looks realistic. The art of 'Photoshopping' is making the image look un-Photoshopped.
 2. You can adjust the "lightness" to add a white overlay on the image. Slight use of this can make teeth look brighter and have more of a shine to them. Again, don't over do it.
And there you have it-- 30% whiter teeth in just 3 minutes. Sure beats those whitening strips you have to wear every night for a month to start seeing results!
2. You can adjust the "lightness" to add a white overlay on the image. Slight use of this can make teeth look brighter and have more of a shine to them. Again, don't over do it.
And there you have it-- 30% whiter teeth in just 3 minutes. Sure beats those whitening strips you have to wear every night for a month to start seeing results!
 As I said earlier, there are multiple ways to approach and accomplish this same effect. If you have any other suggestions how to whiten teeth in photoshop, then please feel free to speak up in the comments below!

About the Author
Eric Wallace is a designer/producer and founder of DP Media Group, a Florida-based branding, graphic design, website, and video production company. Wallace's work can be seen online, in print, and on television/DVD.